8 Best Mid Taper Fade Comb Over Styles for Men (2026)
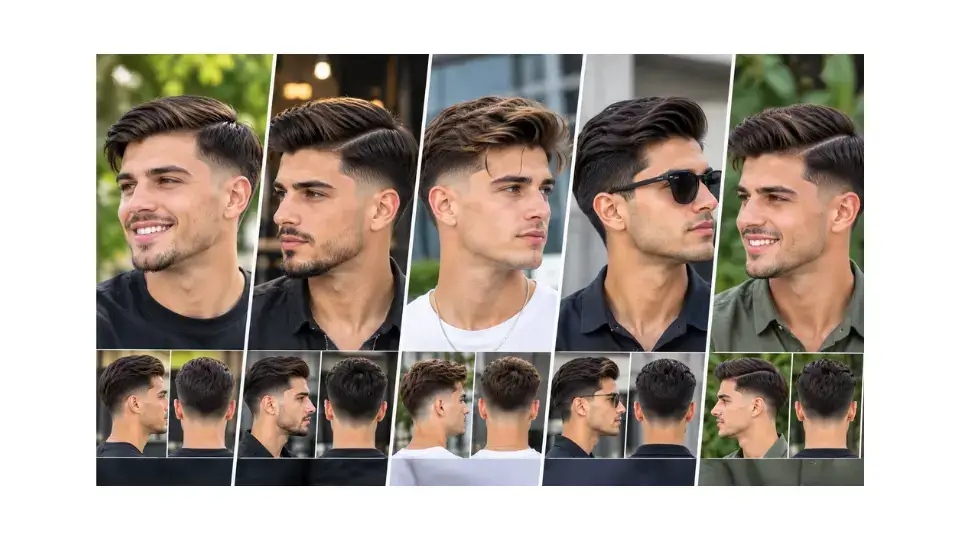
A mid taper fade comb over pairs a defined side part with hair combed neatly across the top, while a mid-height taper keeps the sides clean underneath. It works especially well on straight to wavy hair, where the part holds its shape cleanly. This guide covers 8 ways to wear it, the products that hold the part, and exactly what to ask your barber.
8 Best Mid Taper Fade Comb Over Styles
These 8 mid taper fade comb over styles range from the classic defined part to lower-maintenance takes on the shape, covering most hair types and finishes. Each one lists what suits it best, since a sharp, glossy comb over reads very differently than a soft, matte version.
Classic Structured Styles
Classic mid taper comb over styles keep the part sharp and the finish polished. These are the truest versions of the style.
1. Classic Mid Taper Comb Over
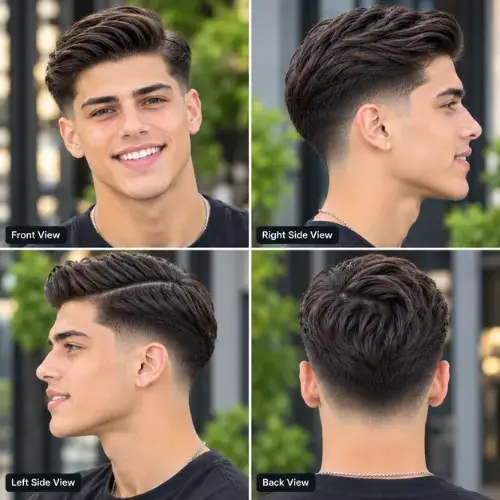
A defined side part directs the top hair across in a clean, controlled line, held with a light to medium-hold product. The mid taper underneath keeps the sides clean without competing with the part.
Best For: Straight hair, formal settings
2. Slick Comb Over
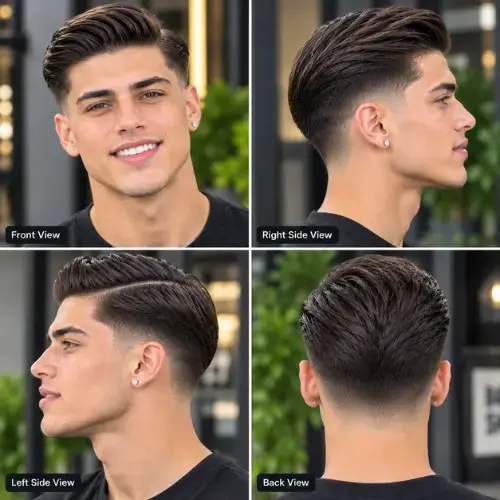
A stronger-hold pomade gives the comb over a glossy, sleek finish that holds the part all day. This version reads more formal than a matte comb over.
Best For: Straight or fine hair
✂ Pro Tip: Comb the part while the hair is still slightly damp — combing fully dry hair tends to create a less crisp, less lasting line.
Textured Variations
Textured comb over variations trade some of the glossy polish for a more natural, matte finish. These suit guys who want the shape without a fully slicked look.
3. Textured Comb Over
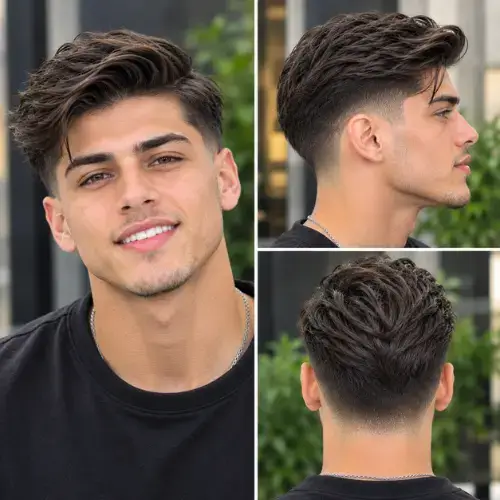
A matte product replaces the shine of a slick comb over, giving a more natural, piecey finish while the part stays defined. This reads more casual than the glossy classic version.
Best For: Thick or medium-density hair
Popular With: A relaxed, modern take on the shape
4. Wavy Comb Over
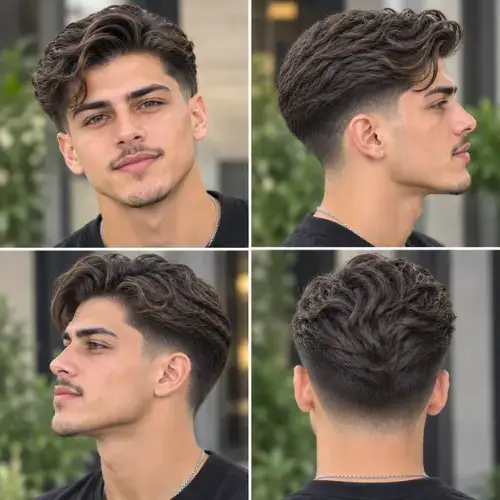
Natural wave adds texture to the combed-over top without much extra product, softening the comb over’s usual sharp line. The taper stays the same as the classic version.
Best For: Wavy hair
Detail and Combination Styles
Detail and combination comb over styles pair the classic shape with a beard, design, or undercut for a more finished overall look. These suit guys already comfortable maintaining a standard comb over.
5. Comb Over with Beard
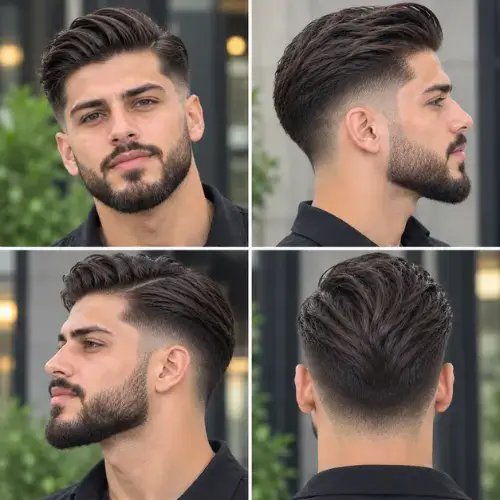
The clean part on top pairs with a full, groomed beard for a mature, put-together look. Keeping the beard neckline as clean as the taper makes as much difference as the comb over itself.
Best For: Square or oval faces, medium-thick hair
6. Comb Over with Design
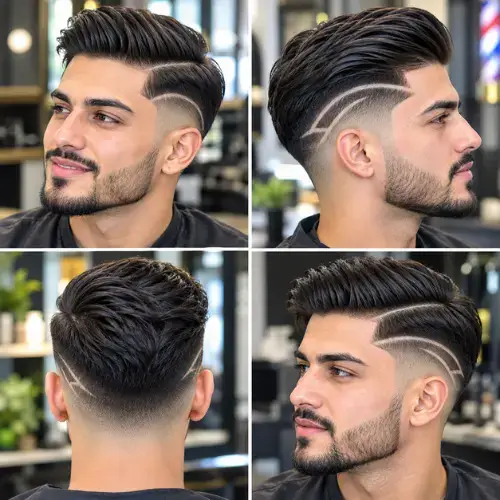
A shaved line or detail cut into the taper adds a bit more edge beneath the classic combed-over top. For more on design placement and depth, see our mid taper fade with design guide.
Best For: Straight or thick hair
7. Undercut Comb Over
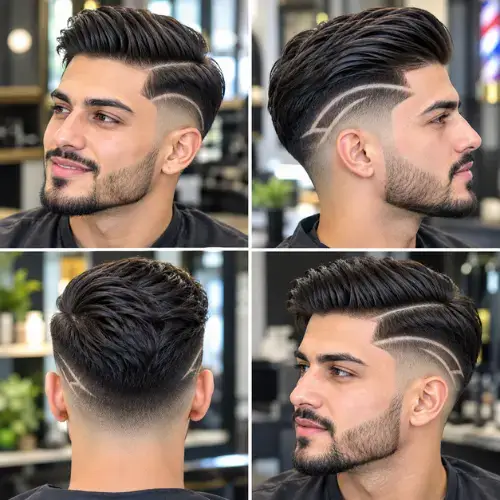
A sharper contrast than a standard taper, with the sides cut noticeably shorter beneath the combed-over top. This creates more definition than a regular mid taper comb over.
Best For: Straight or thick hair
✂ Pro Tip: Ask your barber to keep the undercut length even all the way around — an uneven undercut throws off the comb over’s line even when the top itself looks fine.
Low-Maintenance Version
A lower-maintenance take on the comb over uses a softer part and less product, which reduces daily upkeep without losing the core shape. This suits guys who want the look with less daily effort.
8. Soft Comb Over
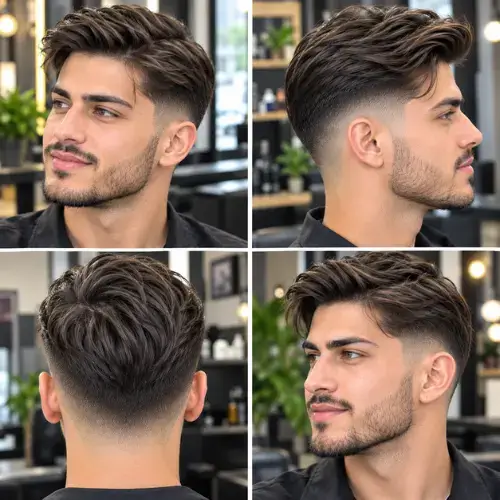
A looser, less precisely defined part gives a softer version of the classic shape, with less product required to hold it. It reads less formal than a slick, sharply-parted comb over.
Best For: Any hair thickness, guys who want lower daily effort
Mid Taper Fade Comb Over Explained: What Actually Holds the Part
A mid taper fade comb over combines a mid-height taper on the sides with hair combed across the top from a defined part, rather than a middle part or swept-back finish. The part sits on one side, with the longer top hair directed across rather than straight back. The taper underneath keeps the sides from competing with the combed-over top.
Why the Comb Over Keeps Coming Back in 2026
The comb over has stayed a barbershop staple in 2026 because it reads as polished and deliberate without needing dramatic height or volume. It works in almost any setting, from formal to casual, just with a different amount of product and shine. Pairing it with a mid taper instead of an undercut keeps the whole look more versatile for everyday wear.
Pros and Cons: What You’re Signing Up For
A mid taper fade comb over delivers a clean, structured look, but it depends on daily combing to hold the shape. The table below breaks down the real trade-offs.
| Pros | Cons |
| Polished, structured everyday look | Needs daily combing to maintain the part |
| Works for formal and casual settings | Cowlicks can fight the part direction |
| Clean taper keeps sides low-effort | Product buildup can look greasy by evening |
| Reads as deliberate, not messy | Less forgiving than a natural, unparted style |
| Pairs with a beard or clean shave | Wind and humidity can loosen the part |
Choosing by Hair Type: What Actually Holds the Part
Choosing the right mid taper comb over depends mostly on how easily your hair holds a defined part, since straight, wavy, thick, and curly hair all behave differently once combed across. The sections below break down what tends to work for each.
Straight Hair
Straight hair holds a comb over’s part most cleanly of any texture, since there’s no natural texture to soften the line. For more general styling detail on straight hair with a mid taper, see our mid taper fade straight hair guide.
Wavy Hair
Wavy hair adds natural texture to the combed-over top, which suits the textured version particularly well. A stronger-hold product helps keep the wave pattern from fighting the part direction.
Thick Hair
Thick hair holds a comb over well but may need a stronger-hold product to keep the volume controlled through the day. Ask your barber to remove some weight on top if the hair feels too heavy to comb across easily.
Curly Hair
Curly hair needs the most product and effort to hold a defined comb over part, since the curl pattern naturally resists a directional line. For curl-specific styling and product advice, see our mid taper fade curly hair guide.
Face Shape Matchups
Matching a comb over to your face shape mostly comes down to where the part sits and how much volume builds on the heavier side. The right balance keeps proportions even instead of exaggerating them.
Oval Face
Oval faces suit nearly any comb over variation, since the proportions are naturally balanced. A classic or slick version both work well here.
Round Face
A slightly higher part with some height helps elongate a round face. Avoid a very flat, low comb over.
Square Face
Square faces handle a comb over well, especially paired with an undercut that adds more definition. The strong jawline complements the structured top.
Heart-Shaped Face
Keep the heavier side of the part relatively simple rather than piled with volume, since extra weight near the temple can widen the upper face further.
Long Face
A comb over with some width rather than height helps avoid adding extra visual length. A textured or soft comb over works better than a very sleek, tall version.
Diamond Face
A textured comb over with some movement near the temples softens prominent cheekbones better than an extremely sharp, glossy line.
Rectangular Face
A moderate comb over balances a long jawline better than an extremely tall or severe version. A soft or textured comb over is usually the more practical choice.
Age Group Breakdown
Age mostly affects how polished or relaxed a version of the comb over feels appropriate, though the style itself works broadly across ages. Setting matters as much as age for most decisions here.
Teenagers
A textured or soft comb over works well for school, since it needs less daily precision than a slick, glossy version. It also holds up better through a full day of activity.
Young Men
This is a good stage to try the undercut or design version, especially with more time available for daily styling. There’s generally more flexibility to experiment with contrast and detail.
Professional Men
A classic or slick comb over reads polished in most workplace settings. Keeping the part precise and the taper conservative avoids looking too casual for daily workplace wear.
Talking to Your Barber: The Exact Guard Numbers
Getting this cut right comes down to agreeing on part direction and top length, since a comb over needs enough length to comb across cleanly. Bring a reference photo and mention which side you want the part on.
For the taper itself, guard numbers matter: – Guard 1: about 3mm – Guard 2: about 6mm – Guard 3: about 10mm – Guard 4: about 13mm
Most mid taper comb overs use a guard 2 or 3 on the sides, blending down to a 1 or skin near the hairline, while the top is left long enough to comb across — usually two to three inches. Ask your barber to check your natural part before finalizing the direction, since combing against your natural growth pattern makes the style harder to hold.
Video Guide: Watch the Part and Blend
Watching a barber cut and comb a mid taper comb over makes the part technique easier to follow than text alone, especially for setting the direction correctly. A good tutorial should show the taper blend alongside the combing and product routine.
Common Mistakes That Break the Part
Most mistakes with this cut come down to combing against your natural growth pattern or using the wrong strength of product for your hair type. Catching these early saves a lot of frustration with a style that depends heavily on daily technique.
1. Ignoring Your Natural Hair Growth Pattern Combing the part against a strong cowlick or natural direction makes the shape harder to hold through the day. Ask your barber to check your natural pattern before finalizing the part.
2. Using Too Little Hold Product A light product won’t hold the part through a full day, especially on thick or wavy hair. Use a medium to strong-hold cream or pomade depending on your texture.
3. Cutting the Top Too Short A comb over needs enough length to actually comb across. Going too short leaves nothing for the part to work with.
4. Combing Fully Dry Hair Combing dry hair tends to create a less crisp part than working with slightly damp hair. Dampen the top before combing for a cleaner line.
5. Letting the Taper Grow Out Unevenly An overgrown taper is more noticeable against a structured comb over than it would be on a looser style. A touch-up every two to three weeks keeps the contrast looking sharp.
6. Choosing the Wrong Hold for Your Hair Type A lightweight product won’t hold thick hair back, while a heavy-hold product can weigh down fine hair. Match the product strength to your hair’s natural weight and texture.
Maintenance Reality Check
Maintaining a mid taper fade comb over comes down to daily combing and product application, alongside the regular taper schedule on the sides. The top needs consistent daily effort to hold its shape.
Daily Styling
Start with damp hair and comb the part into place before applying product. A blow-dryer on a low, cool setting helps set the direction, especially for hair that resists holding a part.
Products That Work Best
A medium-hold pomade or cream suits an everyday comb over, while a stronger-hold pomade gives a more polished, all-day finish for formal settings. A fine-tooth comb also makes a noticeable difference in how sharp the part looks.
Washing Routine
Wash according to how oily your scalp gets rather than a fixed schedule. According to the American Academy of Dermatology, shampoo frequency should match how oily or dirty the hair becomes.
Touch-Up Frequency
The taper on the sides typically needs attention every two to three weeks to keep the contrast against the top looking sharp. Waiting longer makes the overgrown sides more noticeable.
Comb Over vs Other Styles
A mid taper fade comb over differs from a middle part, a slick back, and a regular mid taper mainly in the direction and finish of the top hair rather than the taper itself. The taper technique stays similar across all of them.
Comb Over vs Middle Part
A comb over directs hair across from a side part, while a middle part splits it evenly to fall on both sides of a center line. For more on styling a center part with a mid taper, see our mid taper fade middle part guide.
Comb Over vs Slick Back
A slick back pushes all the top hair backward, while a comb over directs it across from a defined side part. For more on the slick back specifically, see our mid taper fade slick back guide.
Comb Over vs Regular Mid Taper
A regular mid taper without a defined part can be worn natural or with light texture. Adding a comb over gives the same taper base a more structured, directional top.
Frequently Asked Questions
What is a mid taper fade comb over?
A mid taper fade comb over combines a mid-height taper on the sides with hair combed across the top from a defined side part.
How much length do I need on top for a comb over?
Most comb overs need at least two to three inches of length on top for the hair to comb across and hold.
Does a comb over work with curly hair?
It can, though curly hair needs more product and effort to hold a defined part than straight or wavy hair does.
How often do I need a touch-up for the taper?
About every two to three weeks keeps the sides looking sharp against the top.
What product works best for a comb over?
A medium-hold pomade or cream suits everyday wear, while a stronger-hold pomade gives a more polished, longer-lasting finish for formal settings.
Should I comb my hair wet or dry?
Slightly damp is generally better than fully dry, since damp hair holds a crisper, more defined part.
Is a comb over appropriate for the office?
Yes, especially a classic or slick version, which reads polished in most professional settings.
About the Author
Sonia writes and maintains MidTaperFade.com, covering men’s taper fade hairstyles, hair types, styling techniques, and barber-focused haircut guides. Each guide combines hairstyle research, practical styling information, and real reference photos to help readers choose a haircut that fits their hair and personal style.
Conclusion
A mid taper fade comb over works because it delivers a polished, structured top while the taper keeps the sides clean and manageable. The best version depends on your hair texture, how much daily styling time you’re willing to spend, and how formal or relaxed you want the finish to look.
If you’re new to the style, start with a soft or textured version before committing to a fully slick, formal comb over. Choose the part direction first, then let your barber build the taper around it.
Save this guide before your next barber appointment, and bring a clear reference photo showing the part direction and finish you’re picturing. Already tried one of these? Let us know which product held the part best for your hair in the comments.